| This article explains how to add Teleports, Portals, and Landmarks in SchoolSpace. It includes what each feature is, why it’s useful, who can create them, who can use them, and step-by-step instructions for how to add them to your world. |
Keep reading to learn about:
![]() How to Find Specific Coordinates in a World
How to Find Specific Coordinates in a World
Teleports
A Teleport is a clickable object that moves users to a specific location within the same world. Think of it like a subway stop or a school directory. Teleports are often used to create central hubs that link out to important areas like classrooms, offices, and club meeting areas.
| Who Can Add It? | Users with Editor, Designer, Manager, or Owner permission can add a Teleport. |
| Who Can Use It? | Anyone in the world can use a Teleport. |
| Why Use It? | Teleports make it easier to navigate large or complex worlds. |
To Add a Teleport:
- Walk to the location in the world where you want the teleport to lead. This is where users will land when they click the Teleport.
- Click Builder Mode
 on the left sidebar to enter Builder Mode.
 - In the Builder Mode menu at the top of your screen, click:
- Pan
 then click and drag in the world to find the asset you want to turn into a teleport. This is the asset the user will click to use the Teleport and move their avatar.
 - Select
 then click the asset. This will open the Asset Selection menu on the right side of your screen.
- Pan
- Click Configuration → Links.
- In the Link Type dropdown, choose Teleport to another location in this world.
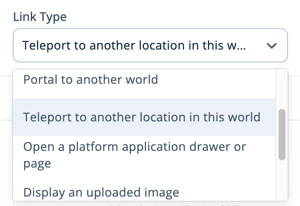
- In the Links section under Teleport Location, you will see two boxes and the X and Y coordinates of your current location. Using these coordinates:
- Enter the X value in the first box.
- Enter the Y value in the second box.
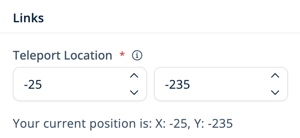
Just like a graph with extended X and Y axes, your current location coordinates can be negative. Make sure you pay attention to the values of your current location and include a minus (-) if needed!
 |
Portals
A Portal is a clickable object that takes users to a different world. The user clicking on the asset must have access to the destination world in order to successfully Portal into that world.
| Who Can Add It? | Users with Editor, Designer, Manager, or Owner permission can add a Portal. |
| Who Can Use It? | Any user in the world can click on the Portal. However, only users who have permission to access the destination world can successfully Portal. |
| Why Use It? | Portals are great for connecting multiple worlds, such as a main campus world linking to a separate world for clubs, a counseling center, or a classroom. |
To Add a Portal:
- Find or place the asset that will contain the Portal:
- To find an existing Asset: Walk to the asset or click Assets
 on the left sidebar and search the Placed Assets list.
 - To place a new Asset: Click Assets on the left sidebar. Click the Placed Assets dropdown and change to SchoolSpace Assets. Scroll or search for an asset to use.
- To find an existing Asset: Walk to the asset or click Assets
- Select the Asset you want to use:
- If you walked to the asset or placed a new asset, enter Builder Mode then click the asset to select.
- If you searched Placed Assets, simply click on the asset in the list.
- If you walked to the asset or placed a new asset, enter Builder Mode
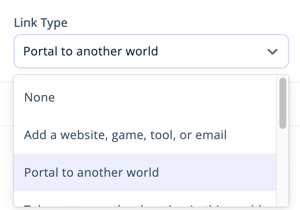
- In the Asset Selection menu on the right side of your screen, click Configuration → Links.
- In the Link Type dropdown, choose Portal to another world.
- Add link information:
- [Required] Add a Portal URL. Using the world URL you want users to land in after clicking (the destination world), copy and paste the part of the URL after schoolspace.io. (e.g. if you want users to navigate to schoolspace.io/my-classroom after clicking, copy and paste
/my-classroom) - [Optional] Add a Portal Location. If you want users to land in a specific spot in the world after clicking, you can add those coordinates here. See instructions below for finding specific coordinates.
- [Optional] Change the Portal Spawn Radius. This will change the size of the area where users land after clicking. When the spawn radius is larger, users will be less likely to land "on top of" each other.
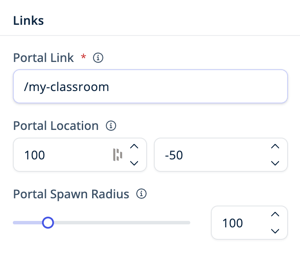
- [Required] Add a Portal URL. Using the world URL you want users to land in after clicking (the destination world), copy and paste the part of the URL after schoolspace.io. (e.g. if you want users to navigate to schoolspace.io/my-classroom after clicking, copy and paste
- To test your portal, click Builder Mode in the left sidebar to exit Builder Mode then click the asset containing the portal.
To Find Specific Coordinates:
- Walk to the location in the world.
- For a portal, walk to the location where you want users to land in the destination world.
- Click Builder Mode on the left sidebar to enter Builder Mode.
- Click any asset to open the Asset Selection menu on the right side of your screen.
- If no asset is nearby, click Assets in the left sidebar and drop a new asset. A rug or floor asset can be useful for this!
- If no asset is nearby, click Assets
- To find the coordinates of an asset:
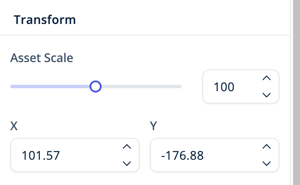
- In the Transform section of the Design tab, note the X and Y coordinates of the asset. Write these down in a notes doc or on a piece of paper.
- To find the coordinates of your avatar:
- Click Configuration → Links.
- In the Link Type dropdown, choose Teleport to another location in this world.
- Under Teleport Location, note the coordinates of your current position. Write these down in a notes doc or on a piece of paper.
- Change the Link Type dropdown back to it's previous setting.
Landmarks
A Landmark is a Zone within your world that can be named and easily accessed by users. Any asset can be a Landmark however we recommend using larger assets like rugs, platforms, or floor tiles. Users can jump to visible Landmarks from This World ![]() in the left sidebar, users within a Landmark are indicated in the Current Users tab of the Users Menu
in the left sidebar, users within a Landmark are indicated in the Current Users tab of the Users Menu ![]() , and Big Crowd Alerts show when 5+ people are in a Landmark Zone.
, and Big Crowd Alerts show when 5+ people are in a Landmark Zone.
| Who Can Add It? | Users with Editor, Designer, Manager, or Owner permission can add a Landmark. |
| Who Can Use It? | Anyone in the world can see a list Landmarks that are designated as visible to current users. The users can click to jump to the Landmark. |
| Why Use It? | Landmarks are quick to set up and very helpful for navigation. Use them for areas like "Front Office," "Science Wing," or "Clubhouse." Big Crowd Alerts appear when 5+ people are in a Landmark. |
To Add a Landmark:
- Find or place the asset that will contain the Landmark:
- To find an existing Asset: Walk to the asset or click Assets on the left sidebar and search the Placed Assets list.
- To place a new Asset: Click Assets on the left sidebar. Click the Placed Assets dropdown and change to SchoolSpace Assets. Scroll or search for an asset to use.
- To find an existing Asset: Walk to the asset or click Assets
- Select the Asset you want to use:
- If you walked to the asset or placed a new asset, enter Builder Mode then click the asset to select.
- If you searched Placed Assets, simply click on the asset in the list.
- If you walked to the asset or placed a new asset, enter Builder Mode
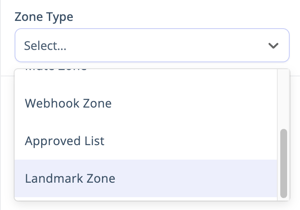
- In the Asset Selection menu on the right side of your screen, click Configuration → Zones.
- In the Zone Type dropdown, choose Landmark Zone.
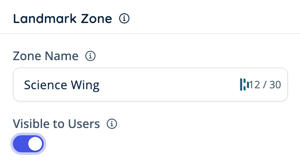
- In the Landmark Zone section, add:
- Zone Name. Use an easily recognizable name like "Science Wing" or "Front Office."
- Under Visible to Users:
- Toggle on so users can see the Landmark in This World
 in the left sidebar and the Current Users tab in the Users Menu
  . We recommend toggling on.
 - Toggle off to hide the Landmark from This World in the left sidebar and the Current Users tab in the Users Menu .
- Toggle on so users can see the Landmark in This World
- To test your Landmark:
- Click Builder Mode in the left sidebar to exit Builder Mode.
- Click This World in the left sidebar and scroll down to the Landmarks section.
- If Visible to Users is toggled on and your Landmark is not in the Landmarks section, click View All. If you still don't see the Landmark, follow steps 1-5 again to check if Visible to Users is actually toggled on.
- Click the Teleport
 icon next to your Landmark to move your avatar to that location.
- Click Builder Mode
The Current User tab in the Users Menu ![]() may not be visible in some worlds. Schools can choose this setting.
may not be visible in some worlds. Schools can choose this setting.