| This article walks teachers through the steps to host a class in SchoolSpace - your safe, fun, and interactive virtual campus. Learn how to set up your classroom, manage participants, use built-in tools, and make the most of each session. |
Keep reading to learn about:
![]()
![]()
![]()
![]()
![]()
Before You Start
System Setup
- Use Chrome or Edge (latest version) for best performance.
- Ensure a minimum internet speed of 5 Mbps upload/download.
- Use a headset and webcam (optional, but helpful).
- Host from a laptop or desktop—not a mobile device.
Recommendations for device type, browsers, internet speed, and more are available in System Requirements.
Set Up and Customize Your Virtual Classroom
- Choose from our pre-designed classroom templates.
- Add personalized touches with interactive content:
Manage Access to Your Class
- Your SchoolSpace world should already be connected to your school’s SSO so that only users within your school and pre-defined grade bands will be able to enter.
- You can further restrict access to your world by:
- If SchoolSpace has been integrated with your LMS, you can also restrict access to your world via course enrollment. For more information about LTI 1.3 and integration with your LMS, contact support@schoolspace.io or your SchoolSpace Customer Success Manager.
Start your Class
- Navigate to your classroom world, either by:
- Navigating directly to the world URL, click ‘sign-in’ and log in with your school SSO credentials.
- Using your dedicated SchoolSpace SSO link to sign in then choose from a list of available worlds.
- Enter your world.
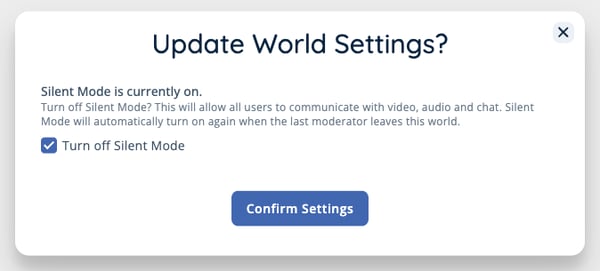
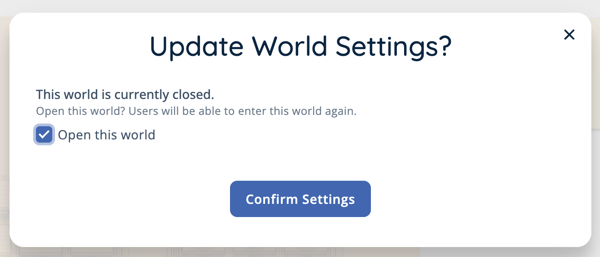
- Depending on the settings of your world, you may need to:
- Turn off Silent Mode. This will enable spatial video chat and text chat functionality in the world.
- Open your world. If your world is closed, students will not be able to enter.
- Make sure students can see and hear you. You can either:
- Turn on Gallery Mode and, if needed, start a recording.
- Turn on Broadcast All and, if needed, start a recording.
- If applicable, start screensharing your lesson for the day! Learn how to share your screen while in Gallery Mode.
- If your internet drops or you accidentally leave the world, Chaperone Mode disables communication between students until you or another administrator returns.
Invite your Students
- Share the classroom URL (e.g.
schoolspace.io/my-classroom) with your students. - If you added a password to your world, distribute the password.
- Contact your SchoolSpace Customer Success representative to connect the class join link directly in your LMS.
Use Classroom Tools & Features
| Tool | Description |
| Current Users | View and manage current users in the classroom. Move to a student, move students to you, spotlight, broadcast, ban from chat, or remove from world if needed. More information can be found in the Users Menu article. |
| Chat | Public and private chat options for student interaction. Learn how to use chat and how to control available chat options. |
| Screenshare | Share your full screen, window, or a browser tab. Learn how to share your screen and how to control student access to screensharing. |
| Broadcast | Broadcast your audio/video to all people in the world using Broadcast. Learn how to Broadcast your video and how to Broadcast a student's video. |
| Gallery Mode | Switch to a more traditional video chat experience where Moderators control who can speak and all video tiles are visible regardless of proximity. Learn how to use Gallery Mode. |
| Spotlight | Enlarge and pin your video, screenshare, or a selected user's screen so that it is visible to all users. Learn how to Spotlight your video and how to Spotlight a student's video. |
| Recording | Record your video or screenshare to save lessons for future review. Learn how to Record your video. |
| Breakout Groups | Easily divide participants into breakout groups for small group discussions. Within these groups, users will only be connected with their assigned group members. Learn how to use Breakout Mode. |
| Embedded Content | Add content in your world to make it more interactive. Learn how to add links to webpages, whiteboards, curriculum, or add video/audio. |
| Polls | Engage with students in real-time using a Poll with configurable live result visibility. Learn how to create, save, and launch a Poll, participate in a Poll, end a Poll, and view Poll results in Dashboard. |
| Attendance Report | Auto-captures who attended and how long they were present. Learn how to access and download attendance reports via User Sessions in Dashboard. |
After Class: What's Saved?
- Attendance Report: View or download attendance reports in Dashboard.
- Recordings: All recordings will be saved in Dashboard where they can be viewed or downloaded.
Tips for Success
- Open the world 5–10 minutes early. You can schedule open/close times or manually open the world.
- Disable Silent Mode before class begins.
- Use Breakout Mode for small group discussion.
- Use Gallery Mode for a structured presenter + participants experience.
- Keep chat open for questions.
- Record sessions for absent students.