| This article outlines best practices for using moderation tools in SchoolSpace. It explains moderation tools, what actions students can take, and how school staff can confidently monitor and manage their virtual worlds to maintain a safe, welcoming environment. |
SchoolSpace comes with tools specifically designed for moderating your virtual campus.
Keep reading to learn how to:
![]() Equip Students with Safety Actions
Equip Students with Safety Actions
![]() Make Announcements, Record, or Share your Screen
Make Announcements, Record, or Share your Screen
![]() Use Moderation Tools to Manage Student Access, Reports, and Message History
Use Moderation Tools to Manage Student Access, Reports, and Message History
Only users with the Moderator or Manager role can access the following moderation tools in a SchoolSpace world. These roles are assigned by your school or district. If you need to update access, contact your school’s SchoolSpace Dashboard administrator or the SchoolSpace Support Team at support@schoolspace.io.
What Can Students Do to Protect Themselves?
Students in SchoolSpace have a set of safety tools to support positive interactions. Encourage students to use these tools responsibly and to report any issues they encounter.
- Walk Away - Students can move away from others to disconnect video/audio.
- Block - Students can block a peer; this removes video/audio and DMs between them.
- Report - Students can report another student. Reports are sent to the platform’s internal messaging system (like Slack, Google Chat, Zoom, MS Teams, email, etc)
- Find a Moderator - Students can easily find a moderator in the world and ask for assistance. Admins of the world will have a star
 next to their name. This is the Admin Identifier.
 - Ask a Moderator for Help - If a student has a question they can raise their hand to alert Moderators, ask for help in the chat, or teleport to a Moderator from the Current Users tab in the Users Menu.
If admins in the world do not have a star icon next to their name, this setting has most likely been turned off. Only Managers can change this setting.
To Make the Admin Identifier Visible:
- In the left sidebar, click World Settings
 → Admins.
 - In the Settings section under Show Admin Identifier:
- Toggle on to make the Admin Identifier visible.
- Toggle off to hide the Admin Identifier.
- Toggle on to make the Admin Identifier
- When the Admin Identifier is turned on, all world admins (like Moderators) will have a star next to their name in the following places:
- The Current Users tab
- Their Video Tile
Open or Close a World
When a world is open, students with access to that world can enter. When a world is closed, students will not be able to enter.
Moderators and World Admins will always be able to enter the world. If a world is closed when a Moderator or World Admin enters, they will see a prompt allowing them to open the world.
 |
To Manually Open or Close a World:
- In the left sidebar, click World Settings → Open/Close World.
- In the Settings section under Close World:
- Toggle on to close the world.
- Toggle off to open the world.
- You will see a popup asking you to confirm if you want to close or open the world.
- Click the Close World or Open World button to confirm your choice.
- Click the Cancel button to return to the previous page and leave the world in its current closed or opened state.
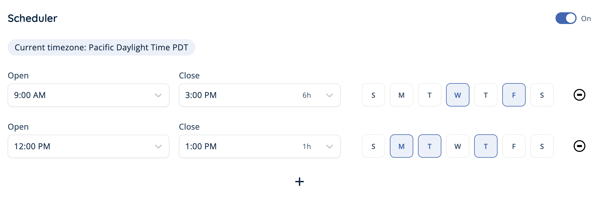
Worlds can also be set to open and close on a schedule. Open / close schedules are recurring and will automatically open and close the world based on the set schedule of days and times. The world will be closed outside of these times but you can still open it manually by following the Open or Close World steps above.
To Set an Open / Close Schedule:
- In the left sidebar, click World Settings → Open/Close World.
- Under Scheduler, click
 Add Time.
 - Choose an open time, close time, and the days of the week. Your current timezone will display automatically. The open and close times will apply to all days you select.
- To add different open and close times for different days of the week, repeat steps 2-3.
- To the top right of the Scheduler, click the toggle:
- Toggle on to activate the scheduled open and close times. Your world will open and close based on the schedule(s) you set.
- Toggle off to deactivate the scheduled open and close times. This will turn off automatic open and close without deleting your schedule(s). Your world will remain open unless manually closed by a Moderator.
- To delete a schedule, click Remove Time
 to the right of the schedule. Learn more about open and close world schedules.
If there are students in the world when a Moderator or Manager closes the world or the scheduled close time occurs, all students will automatically be removed from the world and will not be able to re-enter.
Manage Communication
Moderators can control student access to video, audio, and text chat by using:
Silent Mode
When no Moderator is present in the world, Silent Mode automatically activates and turns off all communication between students including video/audio chat and messaging in chat channels or direct message. This prevents unsupervised student interactions if the only Moderator loses internet connection or accidentally leaves the world.
When Silent Mode is on in a world and a Moderator joins, they will see a prompt allowing them to turn Silent Mode off.
 |
Silent Mode can also be manually turned on while Moderators are present in the world to instantly stop all student to student communication.
To Manually Turn Silent Mode On or Off:
- In the left sidebar, click World Settings → General User Controls (you may need to scroll to the bottom of the list).
- Under Silent Mode:
- Toggle on to stop all student to student communication.
- Toggle off to allow student to student communication.
Camera Controls
Moderators can control student cameras individually or turn video off for all students. Turning off individual student cameras comes in handy when a student might unknowingly have something in their background that they don't want others to see.
To Update Camera Access for All Students in the World:
- Click the Users Menu
 button on the right side of your screen.
- In the Settings section of the Overview tab, next to Camera Access:
- Toggle on to allow users to freely turn their camera on or off.
- Toggle off to prevent users from turning their camera on unless manually turned on by an admin.
- Or, in the left sidebar click World Settings → General User Controls
- Under Camera Access:
- Toggle on to allow users to freely turn their camera on or off.
- Toggle off to prevent users from turning their camera on unless manually turned on by an admin.
Admins can always freely turn their camera on or off.
When Camera Access is toggled on, Moderators can disable access for individual students to prevent them from using their camera. If Camera Access is toggled off, Moderators can enable access for individual students to allow those students to use their camera freely.
To Enable or Disable an Individual Student's Camera Access:
- Click the Users Menu button on the right side of your screen.
- Click the Current Users tab.
- To find a specific user, scroll the list, type their name in
 Filter, or click the dropdown to view users in different Landmark Zones.
 - Under the users name, click Camera Settings
 and choose:
 Disable Camera to turn off the user's camera and revoke their Camera Access.
 - Enable Camera to allow the user to freely turn their camera on or off.
- Or, while connected to the user over video chat, hover over their video tile.
- Click the Camera
 icon.
icon. - In the dropdown menu, choose:
 Disable Camera to turn off the user's camera and revoke their Camera Access.
 - Enable Camera to allow the student to freely turn their camera on or off.
If a Moderator disables a students camera access, the student will not be able to turn their camera on again until a Moderator enables their camera.
Moderators can also manually turn an individual student's camera off.
To Manually Turn Off an Individual Student's Camera:
- Click the Users Menu button on the right side of your screen.
- Click the Current Users tab.
- To find a specific user, scroll the list, type their name in Filter, or click the dropdown to view users in different Landmark Zones.
- Under the users name, click Camera Settings
- Select Turn off camera.
- Or, while connected to the user over video chat, hover over their video tile.
- Click the Camera icon
- Select Turn off camera
The student can freely turn their camera back on after a Moderator manually turns their camera off.
Microphone Controls
Moderators can disable the use of microphones for all users (excluding Moderators) in a world by updating the “Microphone Access” world setting.
To Update Microphone Access for all Students:
- Click the Users Menu button on the right side of your screen.
- In the Settings section of the Overview tab, next to Microphone Access:
- Toggle on to allow users to mute or unmute themselves.
- Toggle off to keep users muted unless unmuted by a Moderator or World Admin.
- Or, in the left sidebar, click World Settings → General User Controls (you may need to scroll to the bottom of the list).
- Under Microphone Access:
- Toggle on to allow users to mute or unmute themselves.
- Toggle off to keep users muted unless unmuted by a Moderator or World Admin.
When Microphone Access is off, students will see that their microphone stays muted and a tooltip will appear when they hover over their microphone explaining that microphones are disabled.
When Microphone Access is toggled on, Moderators can disable access for individual students to prevent them from using their mic. If Microphone Access is toggled off, Moderators can enable access for individual students to allow those students to use their mic freely.
To Enable or or Disable an Individual Student's Microphone Access:
- Click the Users Menu button on the right side of your screen.
- Click the Current Users tab.
- To find a specific user, scroll the list, type their name in Filter, or click the dropdown to view users in different Landmark Zones.
- Under the users name, click Audio Settings
 and choose:
 Disable Microphone to mute the user and revoke their Microphone Access.
- Enable Microphone to allow the user to freely use their mic
- Or, while connected to the user over video chat, click the Speaker
 icon in the upper right corner of their video tile.
 - In the dropdown menu, choose:
- Disable Microphone to mute the user and revoke their Microphone Access.
- Enable Microphone to allow the student to freely use their mic
If a Moderator disables a students microphone, the student will not be able to use their mic again until a Moderator enables their microphone.
To Manually Mute an Individual Student's Microphone:
- Click the Users Menu button on the right side of your screen.
- Click the Current Users tab.
- To find a specific user, scroll the list, type their name in Filter, or click the dropdown to view users in different Landmark Zones.
- Under the users name, click Audio Settings and choose:
- Mute for Me to mute that person's audio. This only mutes the user for the person doing this action. Others will still be able to hear the user.
- Turn Off Microphone to mute the user for everyone. The user can freely unmute.
- Or, while connected to the user over video chat, click the Speaker icon in the upper right corner of their video tile.
- In the dropdown menu, choose:
- Mute for all to mute the student for everyone.
- Mute for me to mute the student from only your perspective.
If a student is manually muted, they can still unmute themselves freely.
 |
 |
|
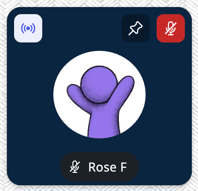
| When the student's mic is on (unmuted), the Mic icon next to their name on their video tile will look like this | When the student's mic is off (muted), the Mic icon next to their name on their video tile will look like this |
Messaging Controls
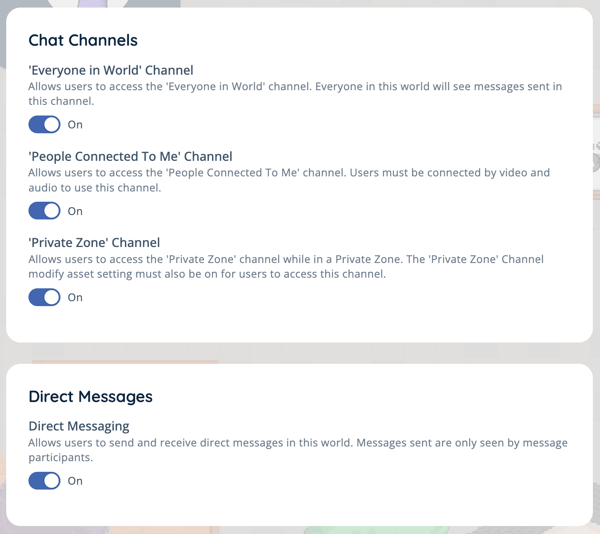
Messaging in SchoolSpace is available through chat channels or direct messaging. World Managers can adjust the messaging options available inside of a world.
- 'Everyone in World' Channel - Accessible by all users in a world regardless of where they are in the world.
- 'People Connected to Me' Channel - Automatically creates a chat channel with everyone you are currently connected to over video chat.
- 'Private Zones' Channel - Automatically creates a channel that can only be seen by users within a Private Zone.
- Direct Messaging - 1:1 and group text chats with friends. Only students who are a part of a chat will see these messages.
Moderators in World is a dedicated channel for Moderators currently in the world and cannot be deactivated.
Moderators and Admins can view all message history (including 1:1 and group direct messages) in Dashboard. Moderators can also ban individual students from using Chat Channels or Direct Messaging.
To Enable or Disable Chat Channels or Direct Messaging for All Users in a World:
- In the left sidebar, click World Settings → Messaging.
- Under Direct Messaging or the chat channel (e.g. 'Everyone in World' Channel):
- Toggle on to make available.
- Toggle off to prevent access.
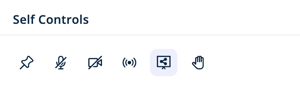
Make Announcements, Record, or Share your Screen
Moderators can use these tools to be seen and heard by everyone, share your screen, or capture a recording to share with others:
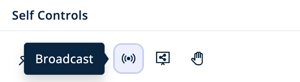
Broadcast
Broadcast allows your video and audio to be heard by more than nine people. The broadcaster will still only see and hear the nine people closest to them even though the broadcaster can be seen and heard by more people. All users with Moderator permission and above can also record while on broadcast in the world.
There are two ways to broadcast:
- Broadcast - All: Speak to everyone in the world at once. Great for announcements that need to be heard by everyone in the world.
- Broadcast - Private Zone: Speak to everyone in a private zone. Only available when your avatar is inside a private zone.
To Start a Broadcast:
- Click the Broadcast
 icon in either:
- Your video tile. You will need to hover over your video tile to see the Broadcast
 icon.
icon.
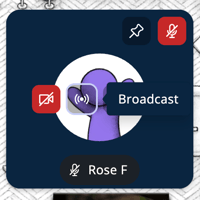
- The Self Controls section of the Overview tab in the Users Menu .
- Your video tile. You will need to hover over your video tile to see the Broadcast
- Choose:
- Turn on Broadcast - All to be seen and heard by everyone in the world.
- Turn on Broadcast - Near to be seen and heard by everyone in close proximity to you.
- If you are successfully broadcasting, you will receive a notification in the bottom right of your screen and a Broadcast icon will appear in the upper left corner of your video tile.
To Stop a Broadcast:
- Click the Broadcast icon in either:
- The upper left corner of your video tile.
- The Self Controls section of the Overview tab in the Users Menu and select Turn off Broadcast.
- The upper left corner of your video tile.
- If you have successfully stopped broadcasting, the Broadcast icon in the upper left corner of your video tile will disappear.
Screensharing
Screenshare makes your screen visible to people you are connected to over video chat. If you screenshare while broadcasting, your screen will be visible to everyone who can see your broadcast. You can share a tab, window, or your entire screen.
To Share your Screen:
- Click the Share Screen
 icon in either:
- Your video tile. You will need to hover over your video tile to see the Share Screen
 icon.
icon.
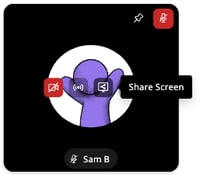
- The Self Controls section of the Overview tab in the Users Menu .
- Your video tile. You will need to hover over your video tile to see the Share Screen
- Choose tab, window, or share your entire screen. If you want to share your audio, you must choose a tab and toggle 'Share tab audio' on.
- When Screenshare Access is set to Anyone in World or Request Access Only, non admin users (like students) can share or request to share their screen by following the steps above.
If the Share Screen ![]() icon is not available on your video tile, screensharing may be disabled in the world. Ask a Manager of the world to enable Screenshare Access.
icon is not available on your video tile, screensharing may be disabled in the world. Ask a Manager of the world to enable Screenshare Access.
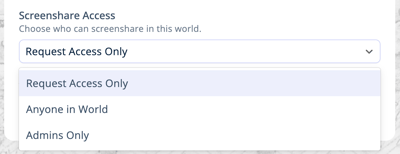
To Update Screenshare Access:
Managers can enable or disable non admin users (like students) ability to share their screen.
- In the left sidebar, click World Settings
 → General User Controls.
 - Under Screenshare Access, click the dropdown and choose:
- Request Access Only to allow non admin users (like students) the ability to request to share their screen. Admins (like Moderators) can freely share their screen.
- Anyone in World to allow all users (including students) the ability to freely share their screen.
- Admins Only to allow only admins (like Moderators) the ability to freely share their screen. This option prevents non admin users (like students) students from sharing or requesting to share their screen.
To Approve or Deny a Request to Screenshare:
- Click the Users Menu button on the right side of your screen.
- In the Overview tab, look for the Screenshare Requests section and choose:
 Grant Screenshare Permission to allow the user to share their screen. A two minute countdown will begin and they user will have to start their screenshare before the countdown ends.
 Deny Screenshare Permission to remove the user from the Screenshare Requests list and prevent them from sharing their screen.

Recording
Record your lessons, presentations, or other activities directly in your SchoolSpace world! You can start a recording before or during a Broadcast, screenshare, or Spotlight. Only the video of the person being recorded or their screenshare will be captured in a recording. Recordings can be accessed in Dashboard.
Students are not able to start a recording. Only Moderators or Managers can start recordings for themselves or other users.
To Record your Video:
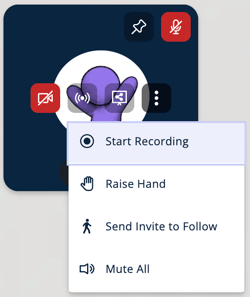
- Moderators can start a recording from either:
- Your video tile:
- Hover over your video tile and click Additional Options

- Select
 Start Recording.
- Hover over your video tile and click Additional Options
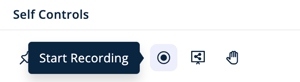
- The Overview tab of the Users Menu :
- In the Self Controls section, click Start Recording
- In the Self Controls section, click Start Recording
- The Current Users tab of the Users Menu :
- Under your name, click Start Recording
- Under your name, click Start Recording

- Your video tile:
- When your video is being recorded, you will see a new recording icon on your video tile, in the Self Controls section of the Overview tab in the Users Menu, and under your name in the Current Users tab of the Users Menu.
- To stop your recording, click the Recording icon in the upper left corner of your video tile.
Important info about Recording:
- Only the video or screenshare of the person being recorded will be captured in a recording.
- Moderators and Managers can start a recording for another user (like a student). Learn how to start a recording for another user.
- Recordings less than 20 seconds will not be saved.
- Once a recording hits 2 hours, the recording will automatically end and will be saved. You can start a new recording if you need to continue.
- Saved recordings can be viewed or downloaded from Dashboard. Learn how to access recordings in Dashboard.
Find and Manage Students
Moderators can view all students currently in the world or manage these students by using:
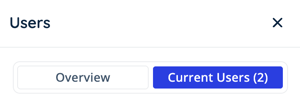
Current Users Tab
The Current Users tab (previously known as the Current Users list) in the Users Menu shows everyone currently in the world. If there are landmark zones in the world, anyone in a landmark zone will also have the name of the landmark zone visible. If the Admin Identifier is turned on in the world, all world admins (like Moderators) will have a star ![]() next to their name.
next to their name.
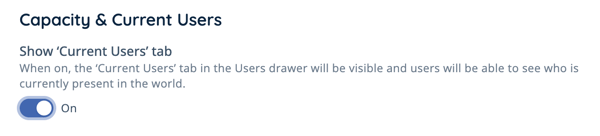
To Enable or Disable the Current Users Tab:
- In the left sidebar, click World Settings → General User Controls.
- In the Capacity & Current Users section under Show 'Current Users' tab:
- Toggle On to make the Current Users tab (formerly known as the 'Current Users List') visible to everyone
- Toggle Off to hide the Current Users tab for all non-admins like students. Moderators and world admins will still have access.
To Access the Current Users Tab:
- Click the floating Users Menu button on the right side of your screen. The button will always display a count of users currently in the world.
- The Users Menu will open on the right side of your screen. At the top of the Users Menu, you will see tabs for Overview and Current Users.
- Select the Current Users tab to view or use the Current Users list.
To View or Adjust Communication Settings from the Users Menu:
- Click the floating Users Menu button on the right side of your screen.
- In the Settings section of the Overview tab, Moderators can toggle on or off:
- Microphone Access:
- Toggle on to allow users to freely use their microphone.
- Toggle off to mute all microphones and prevent users from unmuting.
- Camera Access:
- Toggle on to allow users to freely use their camera.
- Toggle off to turn off all cameras and prevent users from turning their camera on.

- Microphone Access:
- Moderators can also manage Breakout Mode from the Overview tab
To View or Use the Current Users list:
- Click the floating Users Menu button on the right side of your screen.
- Select the Current Users tab.
- To find a specific user, scroll the list, type their name in Filter, or click the dropdown to view users in different Landmark Zones.
- From here, Moderators can choose:
- Grant Admin Permissions
 to make the user an admin in the world. Use this with caution!
 - Pin Video
 and choose:
- Pin to increase the size of the users video tile. This only changes your view and does not impact anyone else.
 Spotlight to put the user on broadcast and increase the size of their video tile for everyone.
- Audio Settings and choose:
- Mute for Me to mute that person's audio. This only mutes the user for the person doing this action. Others will still be able to hear the user.
- Turn Off Microphone to mute the user for everyone. The user can freely unmute.
- Disable Microphone to mute the user and revoke their Microphone Access. The user will not be able to unmute unless Microphone Access is granted by an admin.
- Camera Settings and choose:
- Turn Off Camera to turn off the user's camera. The user can freely turn their camera back on. If the user's camera is current off, this option will be disabled.
- Disable Camera to turn off the user's camera and revoke their Camera Access. The user will not be able to turn their camera back on unless Camera Access is granted by an admin.
- Broadcast and choose:
- Turn on Broadcast - All to make the user seen and heard by everyone in the world.
- Turn on Broadcast - Private Zone to make the user seen and heard by everyone in with them in a Private Zone. This option is only available while in a Private Zone.
- Record to start recording the user's video or screenshare.
- Teleport
 to instantly move your avatar to that user's location.
 - Teleport User to My Location
 to move the user to your location in the world. To move multiple users or all users:
- Click the check boxes to the right of the users' names. Click Select All at the bottom to select all users in the world.
- At the bottom, click Teleport to Me to move the selected users to your location in the world or Teleport to Landmark Zone
 to move the users to a Landmark Zone.
- Safety Actions
 to Remove or Ban a user.

- Grant Admin Permissions
Raised Hands Queue
When students hover over their own video tile or open the Users Menu ![]() , they will see an option to Raise Hand
, they will see an option to Raise Hand ![]() , which triggers a red dot indicator on the Users Menu
, which triggers a red dot indicator on the Users Menu ![]() button and a sound alert for all users in the world. A row with the student’s name will be added to the Raised Hands Queue (also visible to all users) in the Users Menu
button and a sound alert for all users in the world. A row with the student’s name will be added to the Raised Hands Queue (also visible to all users) in the Users Menu ![]() . Moderators can adjust access and sound notification settings for the Raised Hands Queue.
. Moderators can adjust access and sound notification settings for the Raised Hands Queue.
 |
To Access and Manage the Raised Hands Queue:
- Click the floating Users Menu button on the right side of your screen.

- In the Overview tab, the Raised Hands Queue section displays a list of users with their hand raised. From here Moderators can:
- Put the student's video on Broadcast
- Teleport to the student's location
- Lower the student's hand to remove them from the Raised Hands Queue
- Lower All hands to clear the Raised Hands Queue

- Put the student's video on Broadcast
Important info about Raise Hand:
- The raise hand queue will only be present in the Users Menu if there is at least 1 hand raised.
- The only way for a user to be removed from the queue is if they leave the world, lower their hand, or a Moderator lowers their hand.
To Enable or Disable the Raised Hands Queue:
- In the left sidebar, click World Settings → General User Controls.
- In the Communication section under Raise Hand Access, click the dropdown and choose:
- Anyone in world - Sound Off to allow hands to be raised silently. This will disable the sound notification.
- Anyone in world - Sound On to allow hands to be raised with a sound notification.
- Disabled for all to hide the Raise Hand option and prevent all users from raising their hand.

Moderation Tools to Manage Student Access, Reports, and Message History
If inappropriate behavior has occurred or you need to manage a student's access, Moderators can use these tools to remove or ban a student, review student reports, and view chat message history:
![]() Remove a Student from the World
Remove a Student from the World
Remove a Student
Removing a student will instantly kick them out of the world. The student will be able to rejoin the world if the world is still open. You can think of this as a time out or a way to stop inappropriate behavior so you can reset with the student when they rejoin.
To Remove a Student from the World:
- Click Safety Actions in any of the following places:
- The student's video tile.
- Under their name in the Current Users tab in the Users Menu .
- Choose
 Remove From World.
 - The student will:
- Be immediately removed from the world.
- See a prompt telling them "Something Unexpected Happened" and giving them the option to reload.
Ban a Student
There are a few types of bans Moderators can use.
| Ban Type | What Happens to the Student |
Cannot message in Chat Channels (e.g. Everyone in World)
|
|
|
|
|
Cannot enter specific world
|
|
Cannot enter any worlds
|
|
All types of bans can be:
- Temporary meaning the ban is automatically lifted on a set date
- Indefinite meaning the ban remains in place until it is manually lifted
All banned students and the date they were banned appear on the World Bans, Channel Bans, or Platform Bans lists in the Dashboard. Admins can remove a ban at any time.
Temporary Bans
When the ban end date is reached, the user will be automatically unbanned at midnight UTC (e.g. set the Temporary Ban date as July 1, 2025 and the student will regain access on June 30, 2025 at 5pm PDT).
| Time Period | Local Date | Eastern Time (ET) | Central Time (CT) | Mountain Time (MT) | Pacific Time (PT) |
| Daylight Savings | -1 day | 8pm EDT | 7pm CDT | 6pm MDT | 5pm PDT |
| Standard Time | -1 day | 7pm EST | 6pm CST | 5pm MST | 4pm PST |
To Ban a Student from a Single World:
- If the student is currently in the world:
- Click Safety Actions in any of the following places:
- The student's video tile.
- Under their name in the Current Users tab in the Users Menu .
- In the left sidebar, click World Settings → User Sessions (this will open Dashboard in a new tab).
- Find the student in the list (adjust date range if needed).
- Click Safety Actions
- Click
 Ban User from World.
 - Select a Reason for the ban (e.g. threats, hate speech, inappropriate behavior).
- Add Additional Information notes for future reference (every admin will be able to view these comments).
- Decide if it’s a temporary ban (select an end date) or an indefinite ban (leave date blank).
- Click Ban User to confirm the ban.

To Unban a Student and Allow them to Enter the World:
- In the left sidebar, click World Settings → World Bans (opens Dashboard in a new tab).
- Click the
 Unban User from World icon next to the student’s name.
 - Once the ban is removed, the student will be able to rejoin the world.
To Ban a Student from all SchoolSpace Worlds:
- In the left sidebar, click World Settings → User Sessions (this will open Dashboard in a new tab).
- On the left side of your screen, click
 Users.
 - Search by SchoolSpace username or email (exact match required) to find the student you would like to ban from all worlds.
- Click View Details
 .
. - Under the student's information, click
 Ban User from Worlds and Dashboard.
 - Select a Reason for the ban (e.g. threats, hate speech, inappropriate behavior).
- Add Additional Information notes for future reference (every admin will be able to view these comments).
- Decide if it’s a temporary ban (select an end date) or an indefinite ban (leave date blank).
- Click Ban User to confirm the ban.

To Unban the Student so they regain access to their SchoolSpace Worlds:
- Follow steps 1 - 4 above.
- Under the student's information, click
 Unban User from Platform.
To Ban a Student from Chat Channels in a Single World:
- If the student is currently in the world:
- Click Safety Actions in any of the following places:
- The student's video tile.
- Under their name in the Current Users tab in the Users Menu .
- In the left sidebar, click World Settings → User Sessions (this will open Dashboard in a new tab).
- Find the student in the list (adjust date range if needed).
- Click Safety Actions
- Click
 Ban User from Chat Channels.
 - Select a Reason for the ban (e.g. threats, hate speech, inappropriate behavior).
- Add Additional Information notes for future reference (every admin will be able to view these comments).
- Decide if it’s a temporary ban (select an end date) or an indefinite ban (leave date blank).
- Click Ban User to prevent the student from using Chat Channels in the world.
To Unban a Student and Allow them to use Chat Channels:
- In the left sidebar, click World Settings → Channel Bans (opens Dashboard in a new tab).
- Click the
 Unban User from Chat Channels icon next to the student’s name.
 - Once the ban is removed, the student will be able to use chat channels.
To Ban a Student from Direct Messaging in all worlds:
- In the left sidebar, click World Settings in the left sidebar and select any option that will open dashboard in a new tab (e.g. User Sessions).
- Click
 Users on the left side of your screen.
 - Enter the email address or SchoolSpace username (exact match required) of the student.
- Click View Details .
- Under the student's information, click Ban User from Direct Messages.
- Select a Reason for the ban (e.g. threats, hate speech, inappropriate behavior).
- Add Additional Information notes for future reference (every admin will be able to view these comments).
- Decide if it’s a temporary ban (select an end date) or an indefinite ban (leave date blank).
- Click Ban User to prevent the student from using Direct Messaging in any world.
To Unban and allow the Student to regain access to Direct Messaging:
- Follow steps 1 - 4 above.
- Under the student's information, click
 Unban User from Direct Messages.
To View a List of Current World or Channel Bans:
- In the left sidebar, click World Settings .
- Click World Bans to view all students currently banned from the world.
- Click Channel Bans to view all students current banned from using chat channels in the world.
- Dashboard will open in a new tab.
- You will see:
- A List of all students currently banned.
- Ban Start Date.
- Ban End Date (if the ban is temporary).
- Reason for the ban.
- Additional Information shared when banned.
- The Moderator who banned the student.
- Actions Moderators can take.
- From here Moderators can:
- Filter results by email.
- Export
 the World or Channel Bans list.
To View a List of Current Platform Bans:
- In the left sidebar, click World Settings in the left sidebar and select any option that will open dashboard in a new tab (e.g. User Sessions).
- Click Users on the left side of your screen.
- At the top of the page, click the Platform Bans tab.
- From here Moderators can:
- Filter results by email.
- Export the Platform Bans list.
Student Reports
Students can report other students for any inappropriate behavior. Alerts for student reports are automatically routed to the platform your organization has connected (e.g., Slack, MS Teams, email) and all reports can be viewed in Dashboard. Recent reports in a world will also be available within the world for 72 hours.
Reports include:
- Time of incident
- Name of student being reported
- Name of reporter (student who filed the report)
- Reason for the report (selected from a dropdown, e.g., bullying, threats, illegal activity)
- Comments added by the reporter
- World name where the incident occurred
Reported messages will appear as "Dashboard" if not tied to a specific location.
To Access Reports in Dashboard:
- In the left sidebar, click World Settings in the left sidebar and select any option that will open dashboard in a new tab (e.g. User Sessions).
- Click
 Reports on the left side of your screen.
 - Use the options at the top of the table to filter by:
- Type of report.
- Reason for the report.
- Student name.
- Date and time of the report.
- When you have located the report(s) you need, you can click either:
- View Details to see the full report.
- Export to download multiple report details.
- View Details
To Access Recent Reports in a World:
- Click This World
 → Reports.
 - If any reports have been submitted in the last 72 hours, you will see a list of all reports. Only reports submitted in the world you are currently in will be shown.
- Click Expand
 next to the report to:
- View the report reason and additional information.
- Access a direct link to the report in Dashboard.
View Message History
Admins of the world can view the messages of any student at their school, as well as channel messages.
To Access Student Direct or Group Message History:
- In the left sidebar, click World Settings in the left sidebar and select any option that will open dashboard in a new tab (e.g. User Sessions).
- Click
 Message History on the left side of your screen.
 - Enter the email address or SchoolSpace username (exact match required) of the student or students to see their messages.
- You will see:
- The User you searched for.
- All Chat Participant(s).
- When the Most Recent Message was sent.
- The Message Type.
- Actions Moderators can take.
- In the Actions column, click View Details to view the message history.
- From here Moderators can:
- Filter results by email.
- Change the date and time range.
- Export the Message History.
To Access Chat Channel Message History:
- In the left sidebar, click World Settings in the left sidebar and select any option that will open dashboard in a new tab (e.g. User Sessions).
- Click Message History on the left side of your screen.
- Near the top of your screen, click the Channels tab.
- Find the world by scrolling or typing the URL slug in the Filter results field (e.g. schoolspace.io/my-school, type
my-school). - You will see:
- The World Name.
- The World URL slug.
- The Date the World was Created.
- Actions Moderators can take.
- In the Actions column, click View Details to open the Chat Channel message history.
- From here Moderators can:
- Filter results by email.
- Select a specific Chat Channel.
- Change the date and time range.
- Export the Message History.
Keep Learning!
SchoolSpace Roles and Permissions
![]() Understanding the SchoolSpace Sidebar
Understanding the SchoolSpace Sidebar