| This article explains how moderators can use Breakout Mode in SchoolSpace to divide users into small groups for discussion or activities. It covers how Breakout Mode works, how users are assigned to groups, and what tools moderators can use to manage groups. |
Keep reading to learn:
![]()
![]()
![]() How to Use a Breakout Group Preset During a Session
How to Use a Breakout Group Preset During a Session
![]()
![]()
What is Breakout Mode?
Breakout Mode is similar to other breakout tools you’ve probably used on platforms like Zoom. Breakout Mode lets Moderators split users up into smaller groups to help facilitate small group discussions or collaboration. When Breakout Mode is on, these small groups will connect over video chat regardless of their location in the world.
World Admins will not be automatically added to groups. However, they can manually join groups and view groups.
Key Features of Breakout Mode
- Spatial Video Chat is turned off - Group members will stay connected over video chat even if they walk away from each other.
- Groups are capped at 5 users - This leaves room for admins to join the group or spots for broadcasters to connect to each group over video chat if needed.
- Moderators are not auto-assigned to groups - They can manually view any group and connect to everyone in the group over video chat.
How Do I Use Breakout Mode?
To enable Breakout Mode in a world, you need to be a Moderator, Manager, or World Owner. Breakout Mode will apply to all users inside the SchoolSpace world and users who join the world. However, World Admins will not be automatically added to groups.
To Turn On Breakout Mode:
- Click the floating Users Menu
 button on the right side of your screen to open the Users Menu.
- In the Tools tab, use the toggle next to Breakout Mode:
- Toggle on to automatically create Breakout Groups and assign all users (excluding admins) to a group.
- Toggle off to end Breakout Mode.
To Manage Breakout Mode Groups:
With Breakout Mode toggled on, Moderator can manage Breakout Groups in real-time.
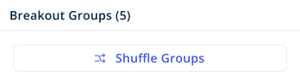
- Shuffle Groups: Click
 Shuffle Groups in the Users Menu to randomly reassign all users to new groups.
- View a Group: To instantly connect with a group over video chat you can either:
- Click View this Group
 next to the Breakout Group in the Users Menu Overview tab.

- Use the Arrows

 at the bottom of your screen to cycle through groups.

- Click View this Group
- Move Individual Users between Groups:
- Next to the user's name, click Swap
 and choose:
 Add [User's Name] to a New Group to move the user to a brand new group.
- Move [User's Name] to Breakout Group [#] to move the user to an existing group with capacity.
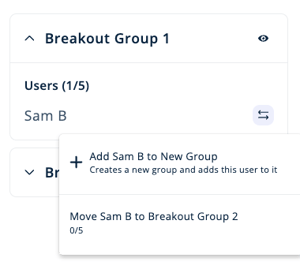
- Next to the user's name, click Swap
Pre-Assign Breakout Groups
Moderators can now create and assign breakout groups ahead of time, making it easier to run structured sessions without manual setup during class.
What You Can Do
- Create and save breakout group presets before a session
- Pre-assign students to specific groups
- Upload a CSV file to assign users in bulk
How to Create a Breakout Group Preset
- Click the World Settings icon (gear icon)
- Select the Breakout Groups tab
- Click Add Preset
- Enter a name for your preset and click Add
- Click the pencil icon under Actions to edit your preset
How to Add Students to Groups
Once inside your preset:
- Click Add Users
- Enter student email addresses or upload a CSV file
If you need help formatting your CSV, download the Breakout Group CSV Template.
From here, you can:
- Move students between groups
- Remove students
- Add new groups using + Add Group
Note: Any world admins included in the .csv file will not be assigned to a breakout group and can move freely between them.
How to Use a Breakout Group Preset During a Session
Once you’ve created a preset, you can easily apply it when running a live session.
- Click the floating Users Menu button on the right side of your screen to open the Users Menu.
- In the drawer that opens, click the Tools tab.
- Locate the Breakout Groups section
Before turning breakout groups on:
- Open the Arrangement dropdown
- Select your preset from the list (instead of “Randomly Assign”)
Then:
- Turn on Breakout Mode
Your students will automatically be placed into the groups based on the preset you selected.
Breakout Mode Frequently Asked Questions
How are Groups Split Up?
Breakout Mode automatically creates groups based on the total number of non admin users (like students) in the world when Breakout Mode is turned on. Groups will be filled before new groups are created. Each Breakout group is capped at 5 users to allow space for Moderators to join by viewing the group.
Examples:
- 12 users → split to 3 groups of 4 users
- 13 users → split to 2 groups of 4 users and 1 group of 5 users
- 21 users → split to 4 groups of 4 users and 1 group of 5 users
What Happens When...
- A new user joins the world while Breakout Mode is on?
They’re added to the group with the fewest users, or a new group is created if all groups are at capacity. - A user tries to enter a private zone or approved list zone?
Nothing happens. These zones are disabled during Breakout Mode.
Breakout Mode Tips
![]() Use Breakout Mode for small group discussions, project-based learning, peer check-ins, or SEL activities.
Use Breakout Mode for small group discussions, project-based learning, peer check-ins, or SEL activities.
![]() Assign Moderators to hop between groups to check in or offer help.
Assign Moderators to hop between groups to check in or offer help.