| Learn how to enrich your SchoolSpace world with links to websites, images, PDFs, text pop-ups, and more! Whether it’s materials to support your lesson plan, instructions for an activity, a classroom exit survey, or an aptitude test - we’ve made it easy for you to embed your content. |
This article focuses on adding the following type of content to an asset:
![]() Links to any website (e.g. a slide deck or game)
Links to any website (e.g. a slide deck or game)
![]() Online forms (e.g. MS Forms, Google Forms, or Typeform)
Online forms (e.g. MS Forms, Google Forms, or Typeform)
![]() Images (e.g. a historical painting relevant to your lesson)
Images (e.g. a historical painting relevant to your lesson)
You must be an Editor, Designer, Manager, or World Owner to add links to content.
Add any Webpage as a Clickable Link
Any URL can be attached to an asset as an iFrame. Follow the instructions below to link to educational websites, PDFs, news articles, forms, quizzes - anything that can be shared as a link.
 |
 |
What is an iFrame?
An iframe is a way to load another website within a website. It works like a window where people can view and interact with a different website while remaining in your world. Some external websites prevent iframing, and require opening the website in a new tab. If you choose one of the iframe options - we recommend testing by exiting Builder Mode and clicking the asset to ensure the link opens as expected. If you get an error, try choosing the Open in New Tab option.
To Add a Clickable Link:
- Find or place the asset that will contain the link:
- To find an existing asset: Walk to the asset or click Assets
 on the left sidebar and search the Placed Assets list.
 - To place a new asset: Click Assets on the left sidebar. Click the Placed Assets dropdown and change to SchoolSpace Assets. Scroll or search for an asset to use.
- To find an existing asset: Walk to the asset or click Assets
- Select the asset you want to use:
- If you walked to the asset: Click Builder Mode
 in the left sidebar then click the asset in the world to select.
 - If you searched Placed Assets: Click the asset in the list on the left side of your screen.
- If you placed a new asset: Press ESC on your keyboard then click the asset in the world.
- If you walked to the asset: Click Builder Mode
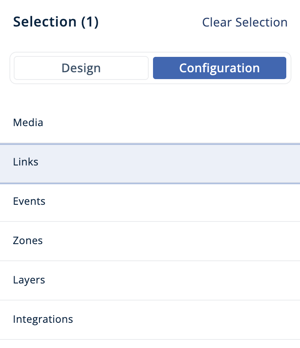
- In the Asset Selection menu on the right side of your browser, click Configuration → Links.
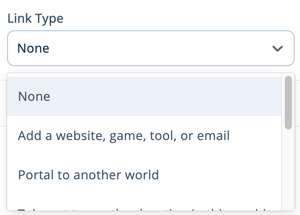
- In the Link Type dropdown, choose Add a website, game, tool, or email.

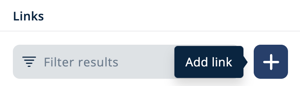
- Under Links, click the purple plus
 button to add a link.
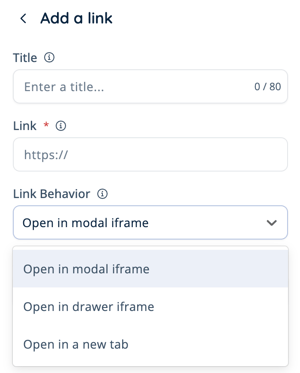
- Enter link information:
- [Optional] Add a Title. The title will be visible to users when they click on the asset. Title is optional.
- [Required] Paste the URL into the Link field.
- Choose Link Behavior:
- Open in Modal iframe: opens inside a pop-up in the world. With this option selected, you can toggle on 'Expanded Iframe' to have the pop-up open as expanded or toggle off to open as a smaller view (which can be manually expanded).
- Open in Drawer iframe: slides out from the left side of your screen.
- Open in new tab: opens the link in a new browser tab (best if Modal or Drawer iframe doesn't work. See testing instructions below).
- Click Add Link to save. You will see a preview card of the link Title, URL, and Link Behavior. We recommend testing your clickable link to ensure it's accessible to students.
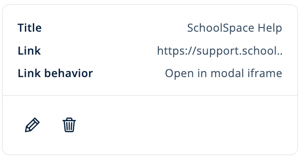
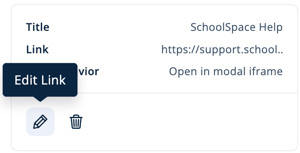
- To edit a link: in the link preview card click Edit Link
 and make your changes.
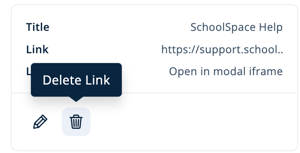
- To remove a link, either:
- Click Delete Link
 to permanently remove the link.
- Change the Link Type dropdown to None or a different option to save the link(s) for future use. To access the saved link(s), repeat steps 1-4 above.
- Click Delete Link
You can add multiple links to an asset. They will appear as a menu of options for the user. To add another link to an asset, follow steps 5-7 for each additional link. You can choose different link behavior for each link.
Testing your Linked Content
After you've added linked content, we recommend testing to ensure it's accessible to students.
To Test your Linked Content:
- If needed, exit Builder Mode either by:
- Clicking Builder Mode in the left sidebar.
- Pressing B on your keyboard.
- Clicking Builder Mode
- Click the asset containing the linked content.
- If you see an error message or the content doesn't open as expected:
- For links to websites, games or tools: try changing the Link Behavior in step 6 above to "Open in new tab."
- For other linked content such as images or pop-up text: Repeat the steps in the instructions and retest.
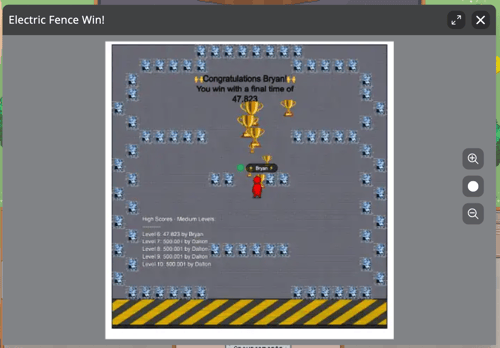
Add an Image as a Clickable Link
Clicking on an asset can also display an image. You can either add a link to an image or upload the image file.
 |
Link to an External Image:
- Follow steps 1 - 5 for attaching a website link.
- Paste the direct image URL (must end in
.png,.jpg,.webp) in the Link field. - Choose Modal or Drawer iframe for Link Behavior.
- Click Add Link to save.
- We recommend testing your linked image to ensure it's accessible to students.
Link to an Uploaded Image:
- Find or place the asset that will contain the image:
- To find an existing Asset: Walk to the asset or click Assets on the left sidebar and search the Placed Assets list.
- To place a new Asset: Click Assets on the left sidebar. Click the Placed Assets dropdown and change to SchoolSpace Assets. Scroll or search for an asset to use.
- To find an existing Asset: Walk to the asset or click Assets
- Select the asset you want to use:
- If you walked to the asset: Click Builder Mode in the left sidebar then click the asset in the world to select.
- If you searched Placed Assets: Click the asset in the list on the left side of your screen.
- If you placed a new asset: Press ESC on your keyboard then click the asset in the world.
- If you walked to the asset: Click Builder Mode
- In the Asset Selection menu on the right side of your browser, click Configuration → Links.
- In the Link Type dropdown, choose Display an Uploaded Image.

- Add information about the image:
- [Optional] Add a Title. The title will be visible to users when they click on the asset and open the image.
- [Required] Click Choose File to upload your image.
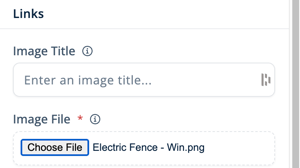
- If you have successfully uploaded the image, you will see a preview of the image below. We recommend testing your uploaded image to ensure it's accessible to students.
You can only add one uploaded image per asset.
Add Pop-up Text as a Clickable Link
Clicking an asset can open a pop-up that displays text.
 |
To Add Pop-up Text:
- Find or place the asset that will contain the pop-up text:
- To find an existing Asset: Walk to the asset or click Assets on the left sidebar and search the Placed Assets list.
- To place a new Asset: Click Assets on the left sidebar. Click the Placed Assets dropdown and change to SchoolSpace Assets. Scroll or search for an asset to use.
- To find an existing Asset: Walk to the asset or click Assets
- Select the asset you want to use:
- If you walked to the asset: Click Builder Mode in the left sidebar then click the asset in the world to select.
- If you searched Placed Assets: Click the asset in the list on the left side of your screen.
- If you placed a new asset: Press ESC on your keyboard then click the asset in the world.
- If you walked to the asset: Click Builder Mode
- In the Asset Selection menu on the right side of your browser, click Configuration → Links.
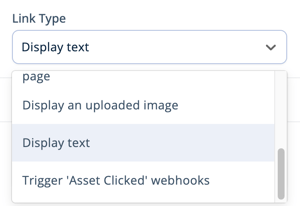
- In the Link Type dropdown, choose Display Text.
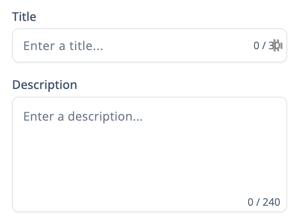
- Add text that will be visible to users:
- [Required] Title. The title will be larger, bolded text. Limit 30 characters.
- [Optional] Description. The description will be smaller text. A URL is supported in description field. Limit: 240 characters.
- We recommend testing your pop-up text to see how it will display for students.
Keep Learning!
![]() Get Started with a Ready-to-Use Scene!
Get Started with a Ready-to-Use Scene!
![]()
World Customization: Quick Start Guide for Teachers
![]()
Schedule an Event in SchoolSpace