| This article explains all the newest changes to the SchoolSpace platform. |
![]()
June 4, 2026: Phrases, Messaging Updates, and Experiences Drawer
New: Phrases
Students can now communicate using a list of pre-approved phrases that can be sent in chat or displayed above their avatar. Designed to support younger learners and encourage safe social interaction, phrases make it easy for students to ask questions, invite classmates to play, and respond with simple messages, even in Silent Mode.
New: Ask a Moderator Chat
Students can now send questions directly to world moderators through the new Ask a Moderator Chat. Moderators can respond from a unified "Moderator" identity, creating a simple and consistent support experience for students.
This feature can be enabled on a per-world basis and includes a customizable message for when moderators are unavailable.
New: Experiences Drawer
We’ve expanded the This World drawer (the world icon in the left sidebar) with a brand-new Experiences section, making it easier than ever for students to discover and engage with everything their world has to offer.
- View all games and activities available in the world
- Browse avatar accessories and badges, with filters for All, Earned, and Locked
- Instantly teleport to their favorite games and activities
Update: Ban Student by Email Address
World admins can now proactively ban students directly from the dashboard using their email address without the need for the student to enter the world first. This new capability gives administrators more control over access and helps address moderation concerns before they become issues.
May 12, 2026: Animated Assets, Keyboard Shortcuts, and AV Updates.
Update: Placed Assets drawer now shows Unique Name
When you open the placed assets drawer, you will now see the name of the asset and the unique name below it (if applicable). This makes it easier to find specific assets if you have multiple of a certain asset in the world.
Update: Gallery Mode
Presenter/audience distinction is clearer, moderators have better controls for promoting and demoting users, and raise hand + drag-and-drop behavior has been refined for smoother session flow.
Update: Audio & Video
- Separate microphone and speaker selection
The enter-world audio dropdown is now split into two — one for input (mic) and one for output (speaker) — so users with different mic and speaker hardware can configure each independently. - Mute audio on assets with embedded media
Users can now mute audio individually on video/embed assets (e.g. Twitch streams, embedded videos), so they can talk over them without needing an admin or world owner to turn the audio off. Mutes apply only to the user who triggered them.
Update: Broadcast Zone
We added a clearer error message for unauthorized Broadcast Zone users. The notification shown to users who walk into a broadcast zone without being on the approved list has been rewritten to clearly explain that they have access to the space but not to broadcast - and what to do about it.
Animated Assets
We've added a new "Animated Assets" category to the asset library featuring assets that actually move — including butterflies, a frog, a treasure chest, and a spinning coin.
To find them, open the asset library, go to SchoolSpace Assets, and select "Animated Assets" from the Filter by Category dropdown.
Copy & Paste Shortcuts
You can now use Ctrl+C to copy an asset (or group of assets) and Ctrl+V to paste! This shortcut works both inside a world and across worlds. (Cmd+C and Cmd+V for Mac users)
April 21, 2026: Gallery Mode, Breakout Groups, World Background Images, Recording Transcription
Update: Gallery Mode
We've made some improvements to Gallery Mode that improve the experience when people have low internet bandwidth! Now, presenters and screenshare will be prioritized for people with spotty internet. This means some people might not see all participants videos when using Gallery Mode.
We've also updated the student experience in Gallery Mode to default to Presenter View. This makes Gallery Mode more efficient. Teachers can still switch their view between Presenter and Gallery View. Teachers also have an option to toggle on student access to Gallery View.
Screensharing has also been updated in Gallery Mode to allow all presenters to screenshare regardless of the world's screenshare access setting. Previously, if a world was set to 'Request Access Only' for screensharing, non-admin presenters could not screenshare. This update fixed that issue!
Update: Breakout Groups
Moderators can now create, manage, and edit breakout group presets directly from World Settings, including pre-assigning users to specific groups before a Breakout Groups session begins.
Moderators can upload a CSV file to bulk-assign users to Breakout Groups, replacing manual entry and making large classroom setups much faster.
The Users Menu now includes additional Breakout Group controls allowing Moderators to apply presets, manage live arrangements, and control whether users can move between groups mid-session.
Update: Default World Background Images
World admins can now choose from a curated library of built-in background images when setting up a world, in addition to uploading their own. This means less time searching for or creating tiled background images!
Update: Recording Transcription
Failed or timed-out recording transcripts can now be retried for processing. We're also planning on adding a progress bar for transcript processing, stay tuned!
Other Updates
- Replacing a scene now asks you to confirm before completing the action. This gives you a moment to confirm if you want to clear everything and replace with something completely new.
- When you a replace a scene, the current scene will be saved automatically! A history of 10 versions of a world will be saved so you can revert back if necessary.
- When a Landmark Zone is selected in the Current Users filter but no people are in that Landmark Zone, you'll now see that the Landmark Zone is empty instead of a blank screen.
- When a student cannot enter a world, the error message will now give more information about why they can't enter. This makes it easier for school admins to understand why the student is having trouble accessing a world.
April 1, 2026: Custom Avatar, Welcome Modal, Recording Transcription, LTI 1.3 / Canvas
Update: Custom Avatar Skin Tone and Photobooth
Custom avatars now allow you to choose a skin tone! There are several pre-configured colors (both real skin tones and fun skin tones). User also have the option to choose a custom color with the color selector or by inputting a hex code.
We've added a photo icon that allows you to download an image or GIF of your stylish avatar! In Customize Avatar, click the photo icon in the upper right of the avatar preview. You can download a PNG of your avatar sitting or a GIF of your avatar dancing in the dressing room.
Update: Welcome Modal
The Welcome modal is getting a redesign! In addition to the update in the design, now if a world is closed, “Available Worlds” that you have access to will be shown in the Welcome modal. This means students who try to enter a world when it's closed will easily be able to find worlds that are currently open. If no worlds a student has access to are open, no worlds will be listed in the Welcome modal.
 |
Update: Recording Transcription
In the Recordings table in Dashboard, admins will now have an option to download the Transcript from the call (in addition to still being able to download the .mp4 recording).
Transcriptions will not be available for past recordings, only recordings taken since this update.
Update: LTI 1.3 / Canvas
We have now released several updates to the Canvas integration. It now supports:
- Scheduling sessions in the same world for different sections
- Attendance
- Viewing Recordings (+ viewing the recording counting toward attendance)
March 11, 2026: Edit Display Name, Expanded iFrame, Gallery Mode Updates, and more!
Update: Edit Display Name on Available Worlds
Teachers can now be given the ability to edit their Display Name on the Available Worlds page in Dashboard. When a teachers makes an edit to their Display Name, their new Display Name will be shown every time they sign in. Previously teachers could only edit their display name in the Welcome modal when entering the world. For more information on giving your teachers this permission, please contact support@schoolspace.io.
Update: Expanded iFrame
By default, when a link is attached to an asset and set to open as a Modal iFrame, the popup will open as the larger, expanded view when the asset is clicked. This setting can be changed when configuring the asset.
Update: Gallery Mode
By default, student (or non-admin) video streams are excluded from a Gallery Mode recording. If your state allows student video streams to be recorded, SchoolSpace can now update your Gallery Mode settings to include student video streams in Gallery Mode recording. Reach out to support@schoolspace.io to implement this setting!
Gallery Mode analytics are now available upon request. Reach out to support@schoolspace.io to get data on Average Gallery Mode Session Length, Gallery Mode Session Counts, and Users Who Turned on Gallery Mode.
Update: My Worlds in Dashboard
Users with Moderator, Editor, Designer, or Manager in a world will now see those worlds included in the My Worlds page in Dashboard.
Update: Spawn Radius
The Spawn Radius field maximum has been updated to allow you to set the Spawn Radius to the full dimension of the world (e.g., if the height and width of the world are 10,000px, the spawn radius can be set to 10,000px maximum). The default value for the Spawn Radius is now 250px. Increasing the Spawn Radius changes how dense or spread out people are when they enter the world. Setting the Spawn Radius to the maximum size now means when people enter your world they can land in a random location anywhere in the world!
Resolved Issues
- Admins can now use their keyboard to move when Spotlight is on.
- Spatial Videos now play when Silent Mode is on.
- Welcome Videos have been fixed and now play the first time a user enters a world.
February 20, 2026: Gallery Mode, Poll
New Feature: Gallery Mode
 |
Gallery Mode is a moderator-controlled presentation mode that switches the entire world from proximity chat into a structured presenter + participants experience.
Gallery Mode is great for:
- Teaching a class.
- Presentations.
- Lectures.
- Panels.
- Large group moments where proximity video chat is not appropriate.
Learn how to use Gallery Mode.
To start using Gallery Mode in your SchoolSpace worlds, reach out to support@schoolspace.io.
New Feature: Polls
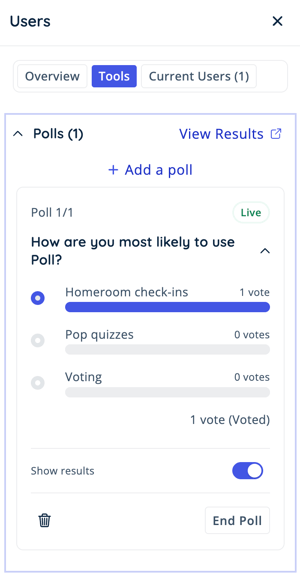 |
Polls are a new real-time engagement tool for Moderators, enabling them to create, launch, and manage polls directly from the Users Menu. Polls support live participation, configurable result visibility, and post-event analysis in the SchoolSpace Dashboard.
January 28, 2026: New Scenes, New Games and Apps, SSO Management, Inventory System
New Scene: Art Museum
 |
Explore an interactive Art Museum where students experience famous artists like Monet, Van Gogh, Rockwell, and more through virtual tours, videos, and hands-on art activities. Students can create and display their own artwork, collaborate in a creative studio, and jump into multiplayer games just outside the museum.
To use this scene, search for 'Art Museum Template' in the SchoolSpace Scene Library. For a full list of the activities available in this scene, check out our Art Museum Scene Guide.
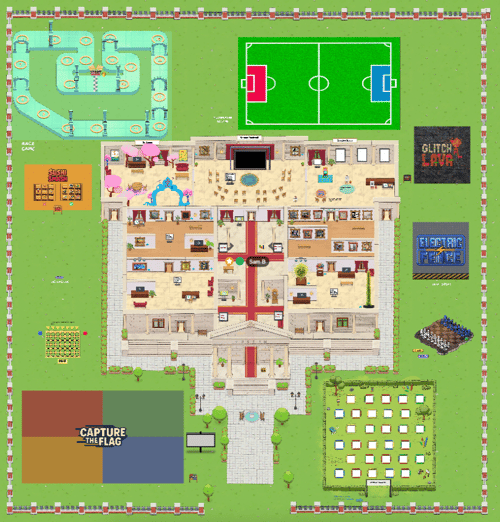
New Scene: Museum Template
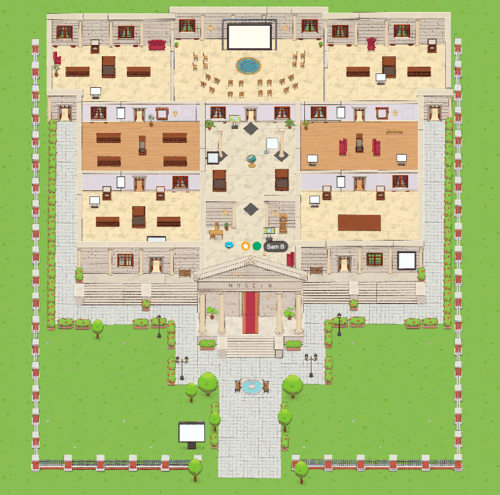 |
Create a museum that is uniquely yours with this blank museum template. The space includes seven customizable areas that schools can turn into exhibits of their choice, from student showcases to virtual field trip experiences. With plenty of open space to add games and interactive activities, this scene makes it easy to design an engaging experience that fits your school’s goals.
To use this scene, search for 'Museum Template' in the SchoolSpace Scene Library.
New Scene: Campground
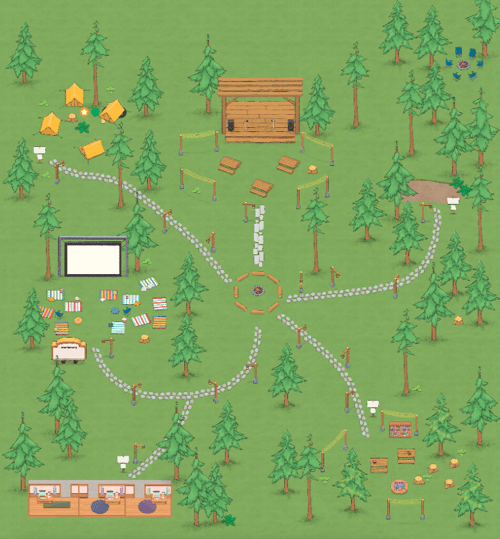 |
A flexible space designed for connection, creativity, and collaboration. Students can watch videos together, read and discuss books, or take the stage for talent shows and performances. With customizable meeting areas and small offices for focused conversations or resources, this scene is perfect for classes, clubs, and school events of all kinds.
To use this scene, search for 'Camping' in the SchoolSpace Scene Library.
New Game: Last Card
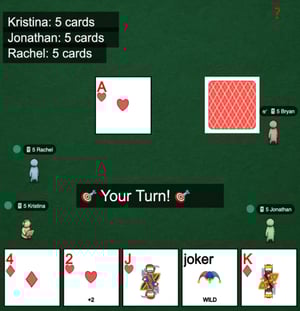 |
Last Card is a fast-paced card game for 2 - 4 players where the objective is simple: get rid of every card in your hand. Everyone starts with 5 cards and takes turns matching their card to the last played card by suit or rank. Watch out for wild Jokers! When a player uses a Joker they can choose a new suit and control the round. Learn more about playing Last Card.
To add this game to your world, search for 'Last Card App' in the SchoolSpace Scene Library.
New App: Student Gallery
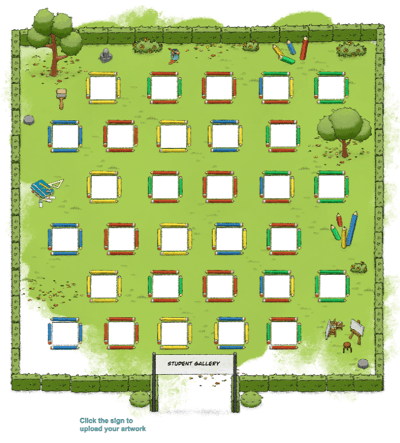 |
The Student Gallery lets students upload their artwork to a shared virtual exhibit. Once approved by an admin, submissions appear in the gallery for the school community to explore and celebrate student creativity.
To add this app to your world, search for 'Student Gallery App' in the SchoolSpace Scene Library.
Update: SSO Management
Our team has made some updates to SSO that will make troubleshooting access issues easier! When a student who should have access to a world gets an error message about SSO access, it can be hard for teachers to understand why this happened. The SchoolSpace team works hard to ensure the smoothest experience for your school that also protects your students. This update makes it easier for us to investigate why access was denied and support new schools with restricting access to worlds during onboarding. Reach out to support@schoolspace.io with any issues regarding SSO access.
Update: Inventory System
We've been expanding our SDK Inventory System and have added two new inventory types: Avatar Accessories and NPCs.
Including Avatar Accessories as an Inventory Type means developers can add the ability for people to unlock special clothing and accessories when a specific action is performed (e.g. I bought 4 chickens in Grow Together and unlocked a chicken suit). When a user chooses the Custom Avatar, they'll have access to any Avatar Accessories they've unlocked by playing games or using apps in SchoolSpace! If you're a developer and curious about building your own games or apps that include unlockable Avatar Accessories, reach out to support@schoolspace.io.
A frequent request from students is coming soon! The addition of NPCs as an Inventory Type means we can begin updating Virtual Pet so your pet can follow you around the world. Once Virtual Pet is updated we'll be sure to let you know. There are many ways NPCs can be used by developers to make SDK apps more dynamic. If you're a developer interested in building an SDK app that includes unlockable NPCs, reach out to support@schoolspace.io.