
| This guide walks you through the core world-building skills in SchoolSpace, one short exercise at a time. Work through it in order to practice selecting and moving assets, adding links and media, creating zones, and dropping in scenes. Each exercise links to a full reference article if you want more detail. |
The best way to learn Builder Mode is to try it. Open a practice world and follow along.
Keep reading to learn how to:
 Drop a New Asset and Upload your Own
What is Builder Mode?
Builder Mode allows you to adjust assets in your world and add new ones. When you are in Builder Mode, your video tile will appear in the lower right-hand corner, and you will not be able to move your avatar.
Helpful Terms to Know:
- Asset - any image that appears in the world. When you hover over an asset a box will appear around it and their will be a cross icon in the middle.
- Scene - A collection of assets that has been saved and can be used.
- Canvas - The area where assets are placed, also referred to as "the world."
- Asset Library - Where you browse and choose assets to add to your world, including SchoolSpace assets, your school's own uploads, and the assets already placed in your world.
- Scene Library - Where you browse and choose scenes to drop into your world, including SchoolSpace scenes and scenes your school has saved.
Select and Move Assets
- Click on the hammer icon
 located at the bottom left to enter world-building mode.
 - In the toolbar on the top of the screen, it should be defaulted to the ”Select” icon
 . This will allow you to select assets inside of the world.
 - Click on any asset to move it around the canvas
- Hold down the shift key to click on multiple assets or click and drag over them to select a group.
Flip, Duplicate, and Align an Asset
- Click on the hammer icon
 located at the bottom left to enter world-building mode.
 - In the toolbar on the top of the screen, it should be defaulted to the ”Select” icon
 . This will allow you to select assets inside of the world.
 - Hover over any asset and click on it to edit it. A drawer will automatically open on the right.
- Under the actions section, practice duplicating, flipping, and aligning the asset by clicking on the icons under the Actions section.
Note: You must have multiple assets selected to use the align tool
Add a Link to an Asset
- Click on the hammer icon located at the bottom left to enter world-building mode.
- Select any asset with the ”Select” icon in the top toolbar.
- Inside the drawer on the right, click “Configuration”
- Click “Links”
- From the link type dropdown choose “Add a website, game, or tool”
- Click on the blue + icon to add a link (you can add as many as you like!)
- Tip: If you are trying to add a YouTube link:
- Be sure to use the embed link and not the YouTube url (click share -> embed-> copy the url)
- Example: https://www.youtube.com/embed/1XNeBdDK5S8?si=STq58VqodwbkA-db
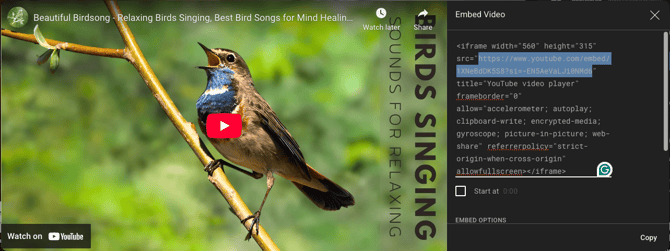
- Give your link a name (optional) and insert your link into the box called “Link”
- Use the Link Behavior dropdown at the bottom to choose how you want the links to display.
- The model iframe will display the content in a box in the center of the screen
- The drawer will display it in the narrow drawer that opens on the left side of the screen.
- A new tab will open the link in a new tab on your browser
- Click on the hammer icon to turn off Builder Mode, and then click on your asset to test your link.
If you get a message that says “refused to connect” this means that the link you are trying to use does not allow iframing. In this case, you will need to update the link to “Open in a new tab.”
Add an Image to an Asset
- Click on the hammer icon located at the bottom left to enter world-building mode.
- Select any asset with the ”Select” icon in the top toolbar.
- Inside the drawer on the right, click “Configuration”
- Click “Links”
- Choose “Display an uploaded image”
- Upload a PNG file to display when the asset is clicked
- Click on the hammer icon to turn off Builder Mode, and then click on your asset to open your uploaded image.
Add Media (a Video or Audio Link) to an Asset
- Click on the hammer icon located at the bottom left to enter world-building mode.
- Select any asset with the ”Select” icon in the top toolbar.
- Inside the drawer on the right, click “Configuration”
- Click “Media”
- From the Media Type dropdown, select either Audio (Link) or Video (Link).
- Selecting Audio (Link) will play only the audio portion of the media.
- Selecting Video (Link) will show the video as one of the peer video boxes when a guest approaches the asset.
- Use Volume to adjust the sound level (<20 is recommended) and Radius to adjust the distance you want the sound to cover.
- To sync the audio for everyone, regardless of when they get to the asset, select Sync Media (recommended)
- Add the URL address of any YouTube video to the media in the field labeled Media Link
Drop a New Asset into the World
- Click on the hammer icon located at the bottom left to enter world-building mode.
- Click the Assets icon
 in the lower part of the left toolbar
 - Click on the dropdown menu that says “Placed Assets” and change it to “SchoolSpace Assets”
- Browse the whole library, filter by category, or search through the library until you find the item you wish to place.
- Note: Clicking the “Table View” button will open a table with additional columns of information on each asset.
- Click on the thumbnail image to add the asset to your world. Click again to place the asset in your world.
- When you are finished placing the asset close the drawer by clicking on the “x” or press the esc key.
Upload an Asset to the World
- Click on the hammer icon located at the bottom left to enter world-building mode.
- Click the Assets icon
 in the lower part of the left toolbar
 - Click on the
 icon.
icon. - In the Upload Assets page, add a name for your asset
- Upload the layers of your asset. If you only have one layer, you can choose whether it should be a top layer or a bottom layer
- Note: Images uploaded as top layers will appear in front of the avatar and images uploaded as bottom layers will appear behind the avatar. For example, if you want the avatar to walk on top of a path: you should add that path image as a back layer.
- Click the Upload Asset button to add it to your asset library or the Upload and Place Asset button to drop it into your world.
- You may need to close the drawer by clicking on the arrow in the upper right hand corner to see and place your new asset.
Create a Zone
- Click on the hammer icon located at the bottom left to enter world-building mode.
- Select any asset with the ”Select” icon in the top toolbar.
- Inside the drawer on the right, click “Configuration”
- Click “Zones”
- From the dropdown, choose the type of zone you want to add:
- Private Zone
- A private zone is an area inside the world that you can limit to a certain number of users.
- Toggle off the private zone channel, if you do not want those in the private zone to have their own chat channel, and select the capacity of the private zone.
- Broadcast Zone
- A broadcast zone allows anyone who steps on top of the asset to broadcast to the world.
- Choose the broadcast type as either near (only those close to you can hear your broadcast) or All (everyone in the world can hear the broadcast)
- Add an “approved list” if you only want this broadcast zone accessible to specific users.
- Mute Zone
- A mute zone automatically mutes the microphone of those that step into the area and will not allow them to unmute until they move out of the designated mute zone.
- Landmark Zone
- When you step onto a landmark zone, everyone can see that you are in that particular area on the current user list. This can make it easy to find other users.
- Give your landmark zone a name and toggle it on to be visible to all users.
Add a Scene to Your World
- Click on the hammer icon located at the bottom left to enter world-building mode.
- Click on the scene icon
 in the lower left
 - From the drop-down, choose “SchoolSpace Scenes”
- Find a scene that you want to drop and click on the “drop scene” down arrow.
- Hover over the canvas to see a preview image of the scene and click to drop it.
- To undo the scene drop, click on the undo button in the notification on the bottom left.
For a full tour of the toolbar, menus, and keyboard shortcuts, see Using Builder Mode.